Your cart is currently empty!
Guide to Matching Door Panels in Classic Car Interiors
Posted on: February 22, 2026 in Guides
Getting interior details right during a classic car restoration can make or break how the finished vehicle feels. While body panels and fender lines get most of the early attention, interior fit and function matter just as much once the doors close. Matching classic car door panels the right way is part of building a finished car that looks just as original inside as it does outside.
Door panels do more than cover the inner door frame. They follow the original design of the car’s trim, cover wiring and lock rods, and give the interior balance. If they’re mismatched or shaped wrong, it throws off the whole look, and sometimes the functionality too.
Understanding Your Car’s Original Interior Setup
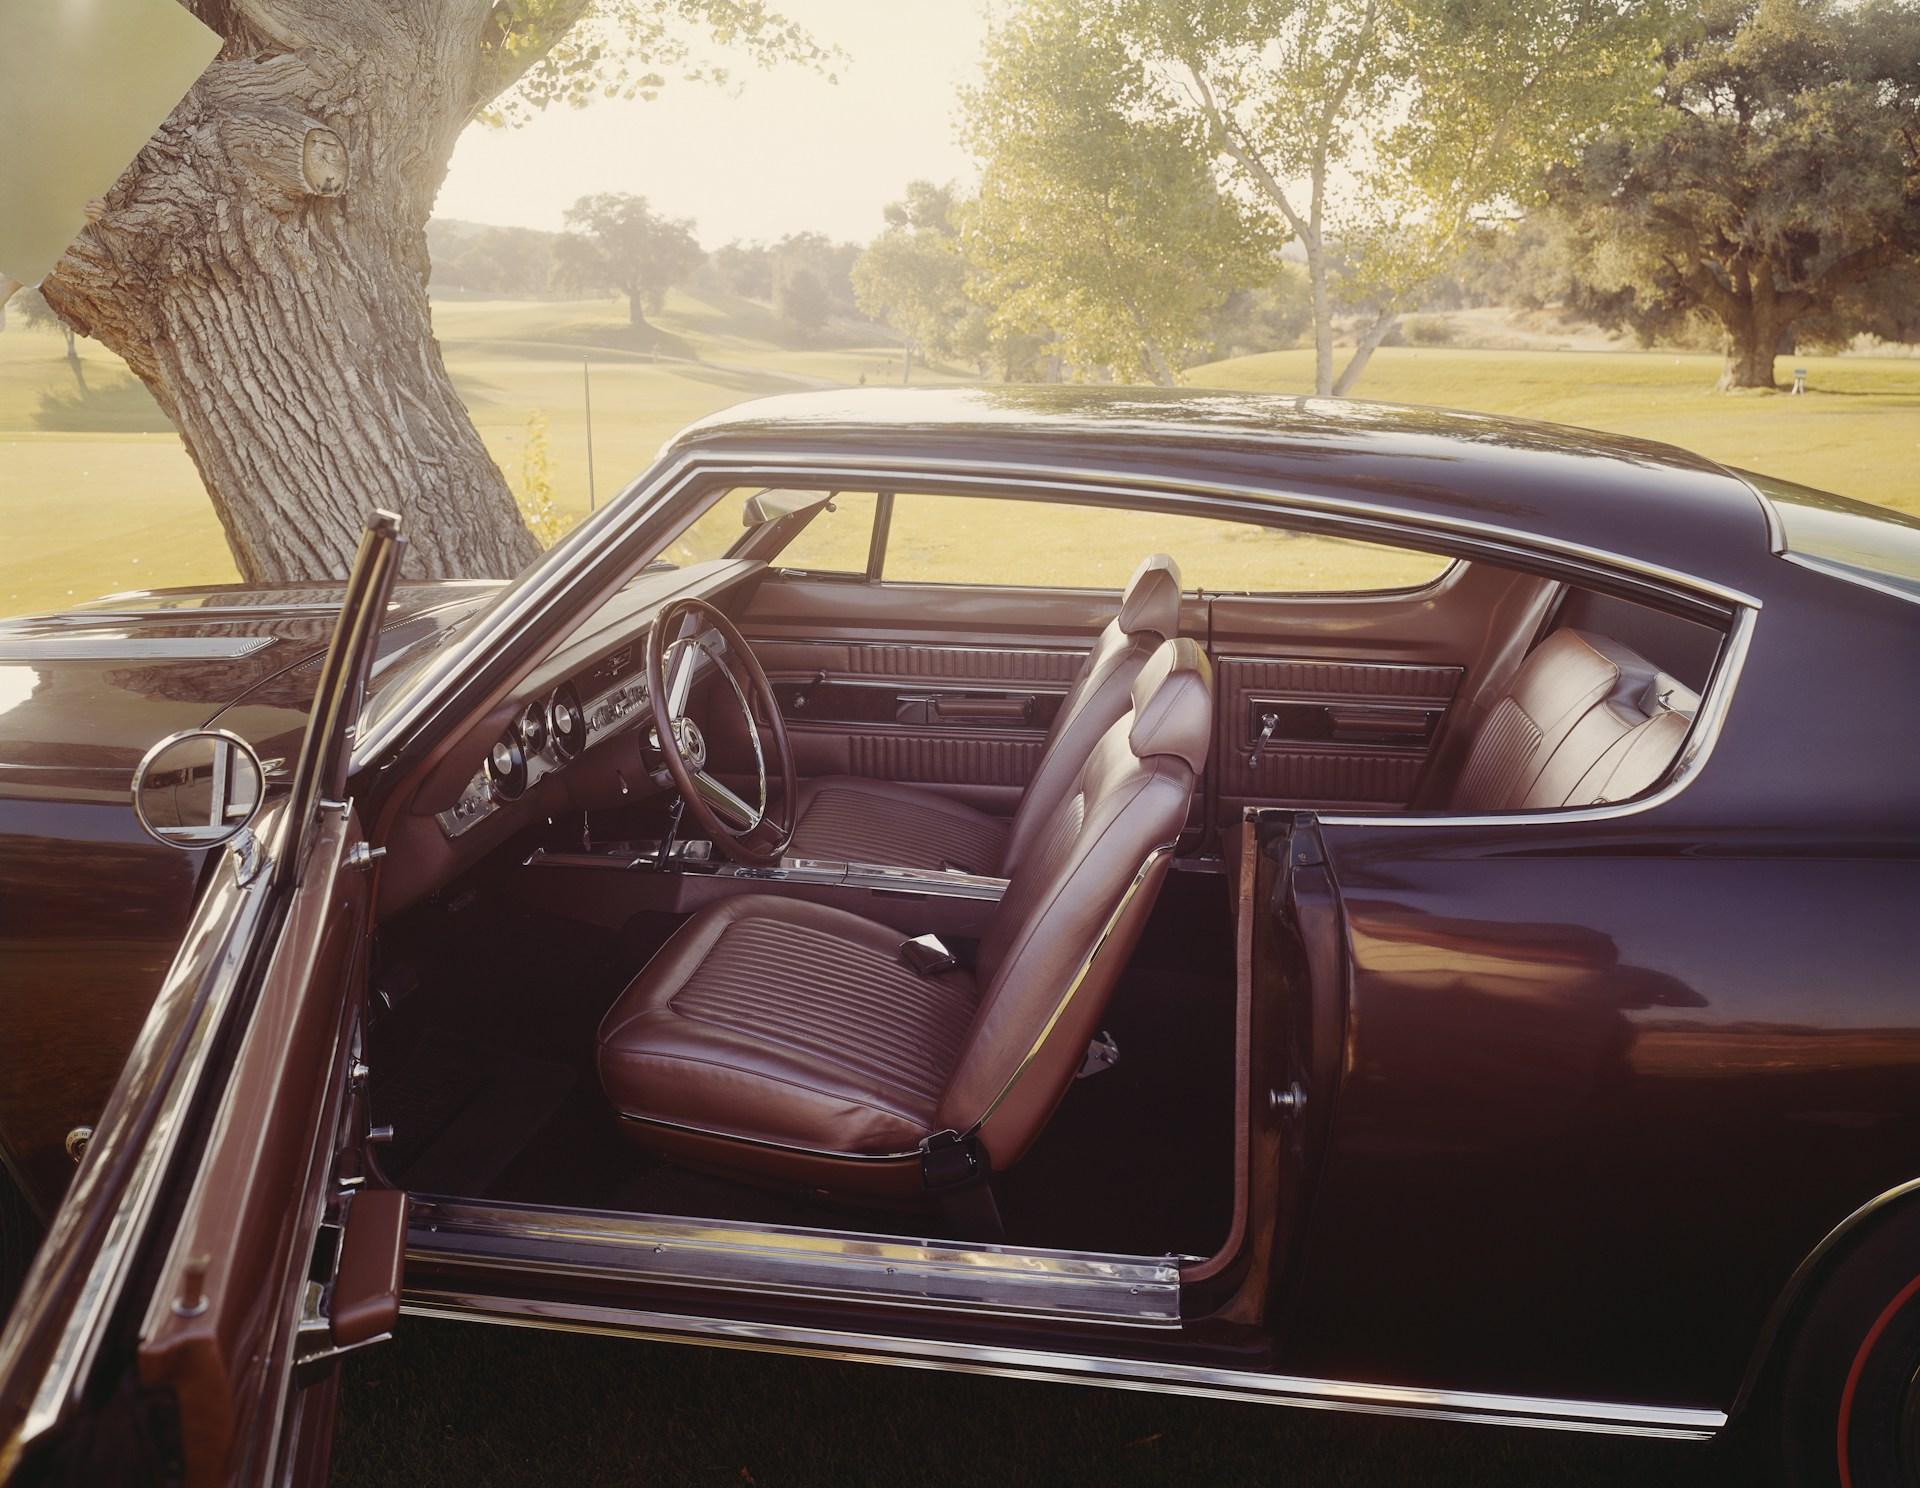
Before picking out new panels, it’s important to take a closer look at how your specific model came from the factory. Every year and trim level had slight changes that can make a difference in alignment, size, or panel style. Door panels for the same car can vary depending on whether it’s a hardtop, coupe, convertible, or sedan.
Trim levels added another layer. A low-trim model might have had basic flat vinyl panels, while a higher-end option came with detailed embossing, upgraded stitching, or added accents like woodgrain or stainless inserts. These are not just cosmetic. They change the contour and screw point layout too.
When originals are missing or heavily worn, it’s easy to mistake one style for another. But mixing up the panel type for your car’s year or trim level typically throws off the alignment between the edges, handle placements, and even window crank depth. That small misfit gets more noticeable once trim or chrome starts going on later.
Types of Door Panels Used in Classic Cars
Muscle cars and vintage models used several types of door panels over the years. It’s helpful to understand the basic differences before you try matching what’s on your build.
Most fall into one of these general types:
• Molded panels (These were made from plastic or vinyl formed into a shape that fit the metal door shell with curves, depressions, or padded areas built in.)
• Flat panels (Usually built with a hard backing board and covered in vinyl or fabric. These lay flat across the door frame and rely on trim or stitching for styling.)
• Two-piece sets (Some used an upper molded portion combined with a lower panel insert. That split allowed more design flexibility on higher trim packages.)
The way a panel fastens to the door also makes a difference. Some snap on with plastic clips, others screw through backing plates, and a few use hidden brackets under armrests. Knowing how your originals were mounted helps avoid extra work or visible gaps. Classic Body Parts carries molded OER door panels for popular applications like 1967 through 1969 Camaro and 1967 Firebird, which are produced in correct OE colors with authentic Madrid grain patterns, matching color-keyed carpet, and vinyl trim, and are made in the USA for an original look and feel.
How to Identify the Right Door Panels for Your Build
Getting a perfect fit on classic car door panels starts with decoding the trim level and door type specific to your car. The trim tag under the hood or inside the door jamb usually tells you most of what you need. That number identifies the model, plant, options, and year, which narrows things down quickly.
To avoid guessing, it helps to track down pictures or documentation from factory service manuals or model catalogs. These show how panels should look with factory specs and help confirm things like stitching patterns or chrome accent placements.
One common issue is ordering panels for the right model, but the wrong body style. For example, a coupe and convertible from the same year might look similar, but their panel shapes curve differently at the bottom or around the rear edge. That creates trouble during install later, when they won’t line up with the door seal line or clip holes. Spotting those changes early can save time and extra drilling or trimming down the road.
Matching Materials and Texture for a Consistent Look
Once the panel type and fit are locked in, the next step is getting the material appearance right. This is not always about finding the original fabric, but about matching the look so the doors feel like they belong in the same car.
Here’s what to focus on when selecting finishes:
• Grain (Most vinyl used on classic panels has a patterned texture. Matching the direction and depth of grain helps the new piece blend in with seats or rear panels left untouched.)
• Color (Fresh panels often look brighter than the old ones. That’s expected. But choosing the closest tone avoids standing out too much.)
• Stitching (Some panels used real thread, others had the pattern molded into the vinyl. Getting this right is part of staying true to the trim level.)
In some builds, replacing one panel does not throw off the look if the rest of the trim is new. But mixing a new door panel with older, faded side panels makes the color mismatch noticeable, especially once light hits from different angles.
Prepping for Installation in Late Winter or Early Spring
Late February is a great time to start prepping interiors before the heavier spring projects hit. Most shops and garages still have a window where the airflow and temps are steady enough to work comfortably, but before long curing times get in the way.
There are a few things to double-check before snapping or screwing new panels onto the door shell:
• Check that your door alignment is still square, especially if you already replaced the hinges or outer skin
• Make sure weatherstripping is seated right and not bulking under the panel area
• Mark your clip locations and test-fit fastener points before locking anything in
Mocking up panels with the windows rolled down helps you center the armrest and crank until everything lines up cleanly. If something looks off during this step, it usually means the wrong style or body fit was selected. It is better to catch that now instead of later when door handles or trim will not install clean. For many 1972 through 1977 Camaro and Firebird interiors, we also stock OER door panel mounting retaining plate sets and inner lower door panel clip and screw sets, which provide the correct hardware to keep new panels secured the same way as the originals.
Building a Seamless Interior Finish
Matching up door panels may seem like a straightforward task, but when everything lines up just right, it changes how the whole build feels. Balanced panel lines and trim spacing help the interior match the quality of the bodywork. Gaps, warps, or off-color materials draw attention right away.
We always treat an interior panel install like we would an outer panel. That means paying attention to depth, edge transitions, and overall flow from part to part. The cleaner the fit, the stronger the visual line across the inside of the car.
In the end, a finished build deserves more than just panels that are “close enough.” Matching classic car door panels with care brings the whole project together where it counts the most, right behind the wheel. There is a difference between fixed and finished, and it shows when you take the time to get it right.
Bringing authenticity to your classic car’s interior comes down to getting every detail right, including materials, fit, and design. We stock pieces built to factory specs, so you do not have to worry about trim, stitch patterns, or mounting clips lining up, and many of our OER door panel sets are produced in correct OE colors with the original Madrid grain texture for popular models like first-generation Camaro and Firebird. Explore our selection of classic car door panels to find options that fit your make and model. Classic Body Parts is here to help you achieve the perfect finish, so call us with any questions about fit or panel installation.
Related Articles

How to Evaluate Classic Body Parts for Fit and Quality
With spring weather warming up, car projects return to the driveway. The covers are lifted, checklists made, and for many […]

Steps to Install Replacement Fenders on a Classic Chevelle
Installing new fenders on a classic Chevelle is more than just swapping metal. The way the panels align with the […]

Understanding the Difference Between Dynacorn and OER Panels
When it’s time to replace damaged or worn body panels during a restoration, one of the first decisions you’ll face […]